Setting up the TK Programmer Pro and changing the sound pack* on your Clark board is quick and easy with step by step current instructions provided below*. If you presently do not own a TK Programmer Pro and need to purchase one, please click here to view the product page.
Setting Up TK Programmer Pro Cables
- Plug in the 10 PIN cable into the programming unit
- Map the PINs as follows to connect the 10 PIN cable to the 7 PIN cable (from L to R 10 PIN to 7 PIN)
- Starting from the 10 PIN cable
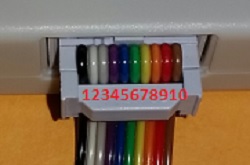
- Connecting to the 7 PIN cable and connect as follows. The top half of the image is the end of the 10 PIN cable and the bottom half of the image is the end of the 7 PIN cable.
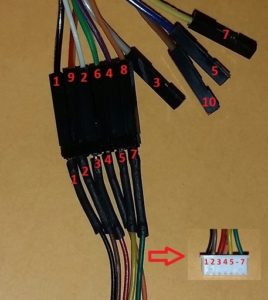
- Starting from the 10 PIN cable
NOTE – Wires 3, 5, 7, and 10 from the 10 PIN cable are not connected.
NOTE – There is no wire 6 on the 7 PIN cable.
Installation and Configuration of FlyPRO Software
- Click here to download the FlyPRO software
- Unpack the zip archive and run the installation application to install the FlyPRO software

- Once the installation is complete, run FlyPRO
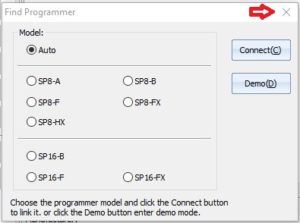
- If you receive the Find Programmer popup the 1st time loading the application, this can be closed
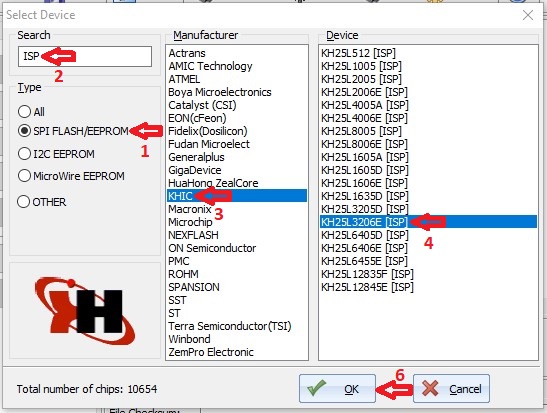
- From the Device menu, click on Select Device

- On the Select Device prompt
- Set Type as Flash/EEPROM
- Enter ISP in the Search field
- Set Manufacturer as KHIC
- Set Device as KH25L3206E[ISP]
- Click OK when done to save the device configuration
- Click on Option
- Uncheck Device ID Check

- Check Power Supply for Target System and leave Voltage at default value of 3.3V
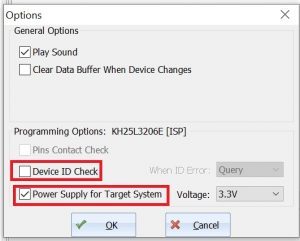
- Uncheck Device ID Check
- Close out of the FlyPRO application
- You are now ready to program the desired sound pack onto your TK board
Sound Pack Programming
NOTE – Power off your TK board 1st. Damage may be incurred during programming when the TK board is still powered on. In the event damage is incurred due to failure to power off the TK board by the end user. The end user will have the option to request and purchase a repair.
- Insert the programming cable into your TK board (port J6) and then the TK Programmer Pro into your USB port
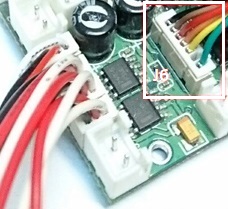
- Open the FlyPRO software

- Click Load to select the sound pack to load.
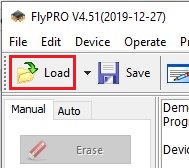
- Upon locating the applicable sound pack, select the run time.bin version of the listed files.
i.e. js2 run time.bin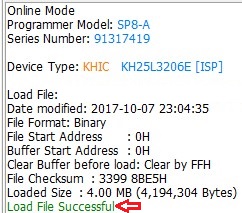
NOTE – Make sure the load was successful, as you may need to reload the file if it was not. - Select the Auto tab, all boxes are to be checked, and then click Auto Start to begin programming
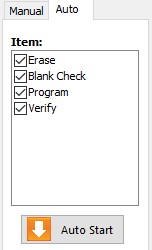
- Wait for the application to complete programming and notification of will display on the screen when programming is finished. Programming the sound pack generally takes 3-5 minutes to complete.
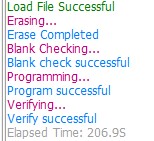
- Exit FlyPRO application when you have completed programming your TK board
- Disconnect TK board from programming cable and Programmer Pro from USB port
- To complete the programming of the sound pack, you must power on the TK board. Please allow 2-3 minutes for programming to complete before powering off the TK board. It is recommended, if available, prior to powering on the TK board to connect an LED to port J3 as a programming indicator. The LED will stop flashing once the programming has completed.
Troubleshooting Tip – In the event the TK board loses power prior to completing the programming noted in step 9 and the sound pack did not properly program. Please complete a board reset to factory settings with the programming remote, as this commonly will resolve this issue. See programming guide for your respective TK board for more information on how to complete.
*Please note that periodic software updates may impact the step by step instructions. This may include, but is not limited to FlyPRO navigation, the download link to download at the vendor site, and/or the GUI of the application itself.
*Only the “P” variant TK board permits the sound pack to be changed. The TK22 series is a static sound set and cannot be changed by the end user. All non-TK22 series boards sold by DAK RC Tanks, unless otherwise noted , will be the “P” variant TK board and thus able to have the sound pack changed.